Geotagging fun with a GPS camera phone

Flickr geotagging NSIT Map

I pity all of you who dont know about GPS and Geotagging photos. I have been hooked ever since i discovered it. I use the Locr utility in my windows mobile cellphone (also works in Symbian phones). Your phone must have GPS or you must have a Bluetooth GPS receiver.

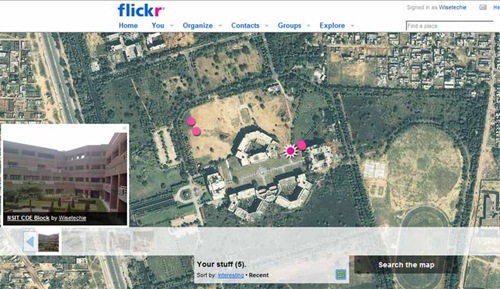
That way, the photos you take will be implanted with GPS co-ordinates of the location you took the photos at. Its accurate to about 50 metres or so. See the dot highlighted in the photo above, it should have been in the bottom right building. So it essentially means if someone wants to nuke the NSIT COE block using GPS, he/she will hit the library instead 😛

This way when you share photos, you can share the photos using a map with your friends and family. That way they will be able to see where the photos were taken.

Use locr to geotag your photos (Wind. Mobile or Sym)

Locr Logo Geotagging

Locr is an amazing software. I first discovered it in my father’s Nokia E71 (review soon). Anyway, i installed it on my Asus P320’s windows mobile, thank god the version worked on my phone also even though it was meant for windows mobile 5 and my phone has windows mobile 6.1.

So it has versions for both windows mobile and symbian, so far so good. So the long and short of it. The software allows you to easily embed the information about the GPS coordinates of the location you took your photo. This info is easily recognised by Flickr and Zooomr. So you can actually see the photos you took on a map (and trust me it looks awesome).

Currently i have taken only photos at my house, so i cant show you the feature for privacy’s sake. So i will show you the photos in locations when i go out. Your phone must have GPS for this feature.

Solving the Realtek HD Audio error : Error 0xE0000227

There is really only 1 way to install the Realtek HD Audio drivers properly. No matter what all other forums say. Service Pack 3 is the main culprit as the drivers see that its above SP2 and dont install. I personally face this situation and was really distressed because it looked like either i will have to reinstall Windows Xp or have my new supercool and super monster computer without sound. Imagine having a monster PC with a motherboard with HD Audio and your driver doesnt install.

Both scenarios were something which i would never have approved of. Anyway so i Googled. I got 10s of solutions but most didnt work. Only 1 worked and i will put it here hoping that Google dear will catch it and people who face this problem installing the Realtek HD Audio 0xE000027.

  1. First Step is to make sure all instances Realtek Audio and its associative softwares are uninstalled from add remove programs and device manager. This includes Intel High Definition audio.
  2. On your PC change the CSDVersion registry key to Windows XP SP2:
    HKLM\SYSTEM\CurrentControlSet\Control\Windows\CSDVersion value=200

This problem arises as the patch thinks that SP3 includes a better version of the patch itself and hence doesn’t install itself.

3. Download the latest drivers from the Intel website, navigate to the KB888111 patch.

4. But before installing the patch, goto your device manager and disable the UAA. Now uninstall the UAA.

5. Install your patch now.

6. Install the Realtek drivers now and things should work.

7. Change the SP version to 300 again.

If it didnt work, try once again. I can enjoy 7.1 channel high definition sound from my Intel Original motherboard now. Realtek HD Audio now works fine. Hopefully Error 0xE000027 is fixed now.

If this helped solve your problem, consider making a small donation($1 even 🙂 ) via paypal button below towards the maintenance of this website (hosting + domain name). All proceeds will be directly spent on bringing you more such helpful posts. 🙂


Disclaimer : Advice on as is basis, this worked for me, may or may not work for you, but it should
Windows Mobile FAQs: Putting Bluetooth received files in your memory card

  Well if you have a Windows Mobile based Bluetooth phone and love exchanging files among your friends , then there are 2 questions you must have asked yourself or a friend.

1. How to receive incoming files via bluetooth , most windows mobile users find that by default the incoming file feature is disabled in Windows Mobile phones.

2. How to ensure that files received via bluetooth are saved directly onto your memory card. Most smartphones and Pocket PCs have limited internal memory, often just enough to support the default Windows Mobile installation.

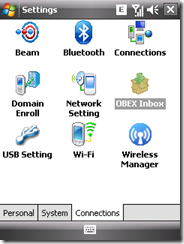
The straight answer is a software called Obex Inbox (3rd party software, research before use). Install the software and reboot your Windows Mobile phone.

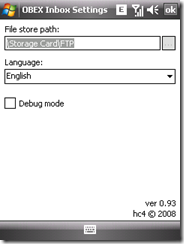
Obex Inbox1Obex Inbox 2

Now goto settings on your Windows Mobile phone and Just give the path as Storage Card/folder in your Obex settings and all incoming bluetooth beams will be stored in your storage card.

For more Windows Mobile tips and tricks keep watching the blog 🙂 . The screenshots are taken on the Asus P320 smartphone with Windows Mobile 6.1 Professional.

The Windows Mobile Bluetooth FAQ

Well these are general facts about using bluetooth on your windows mobile mobile phones, most people complain that that they are able to send files and images via bluetooth but when receiving they receive errors like “Unable to Connect” or unable to send files. Most think that this error is caused due to their Windows Mobile Phones, but it isnt so (technically), Imate, HTC, Asus etc. wont make phones with bluetooth not able to receive files.  The trick is basically the same for windows mobile 5 and windows mobile 6, i have taken the screenshots from windows mobile 6.1 on my Asus p320 phone, but i remember it was more or less the same on my Imate and its windows mobile 5.

These are the steps needed to setup your windows mobile device to receive photos/music/data files:

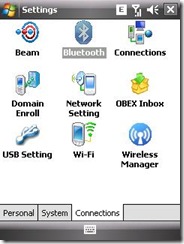
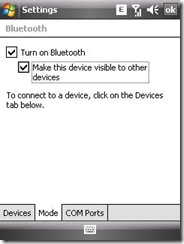
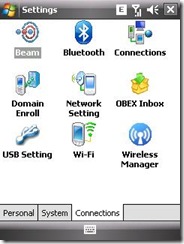
Step 1: In Settings click on Bluetooth, select the mode tab and switch on bluetooth and make this device visible to other devices.

Screen002 Screen003

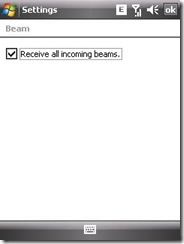
Step 2: In Settings , click on Beam and check receive all incoming beams.

 Screen004 Screen005

After you complete these 2 steps all of your bluetooth incoming beams should reach your mobile phone and you should be able to share photos, files and music with your friends and receive it from them.

But another problem, all incoming files are stored in my documents, how do you ensure that these are stored in storage card ? Answer to that next week 🙂

Alert : Secure your Wifi Connection now !

Well, we had made these videos a few months ago telling people how to secure their Wifi connections quite frankly because many people use other people’s internet without their knowledge. We had made the videos to prevent pranks where kids use other people’s networks to save some money.

But the recent blasts in India opened a new picture. Terrorists used the Wifi connection of an American citizen living in Navi Mumbai to send threatening emails and emails taking responsibility for blasts. As an Internet user, its your responsibility to secure your connection and make sure criminals are not using it. The following 2 videos will help you secure your Wifi connection. I will also make another video, showing you how to implement MAC address filtering to further strengthen your Internet security.

These videos are for Linksys WRT54G series, if you have some other router, refer to your user manual to see how this is done or search youtube, someone might have made a video for your model too.

Securing your Wifi connection (WPA security , only people will passphrase will be able to logon to it wirelessly)

Password protect your Router also

This post is issued in public interest